Order Creation
Two Types of Order Creation
Order creation can be done in two ways.
You can enable your customers to place orders by themselves through the Billie Hosted Payment Page. This is normally the use case for online shops. This is described in scenario 1.
You can create orders directly from your backend without customer interactions. This is normally the case for orders coming from other sources or channels, such as telesales. This is described in scenario 2.
If you are receiving the order from other sources or channels (such as telesales), you can create orders directly from your backend without customer interaction. This is described in scenario2.
Scenario 1: Using the HPP
If the customer is present and creating the order by itself, you will be using the Billie HPP to let the customer interact with Billie to provide its consent to the transaction.
Scenario 2: API-only
If the customer is placing and confirming an order via a channel directly connected to your backend, and you only need to submit the order to Billie, then you can use a direct API call to create the order. This API call can also return a Link to the Billie HPP if a customer interaction is needed or wanted also from the backend. For instance, for a telesales use case.
In all cases, Billie will then do a risk check in real time. Based on the risk check, you will receive a result in the form of an order state.
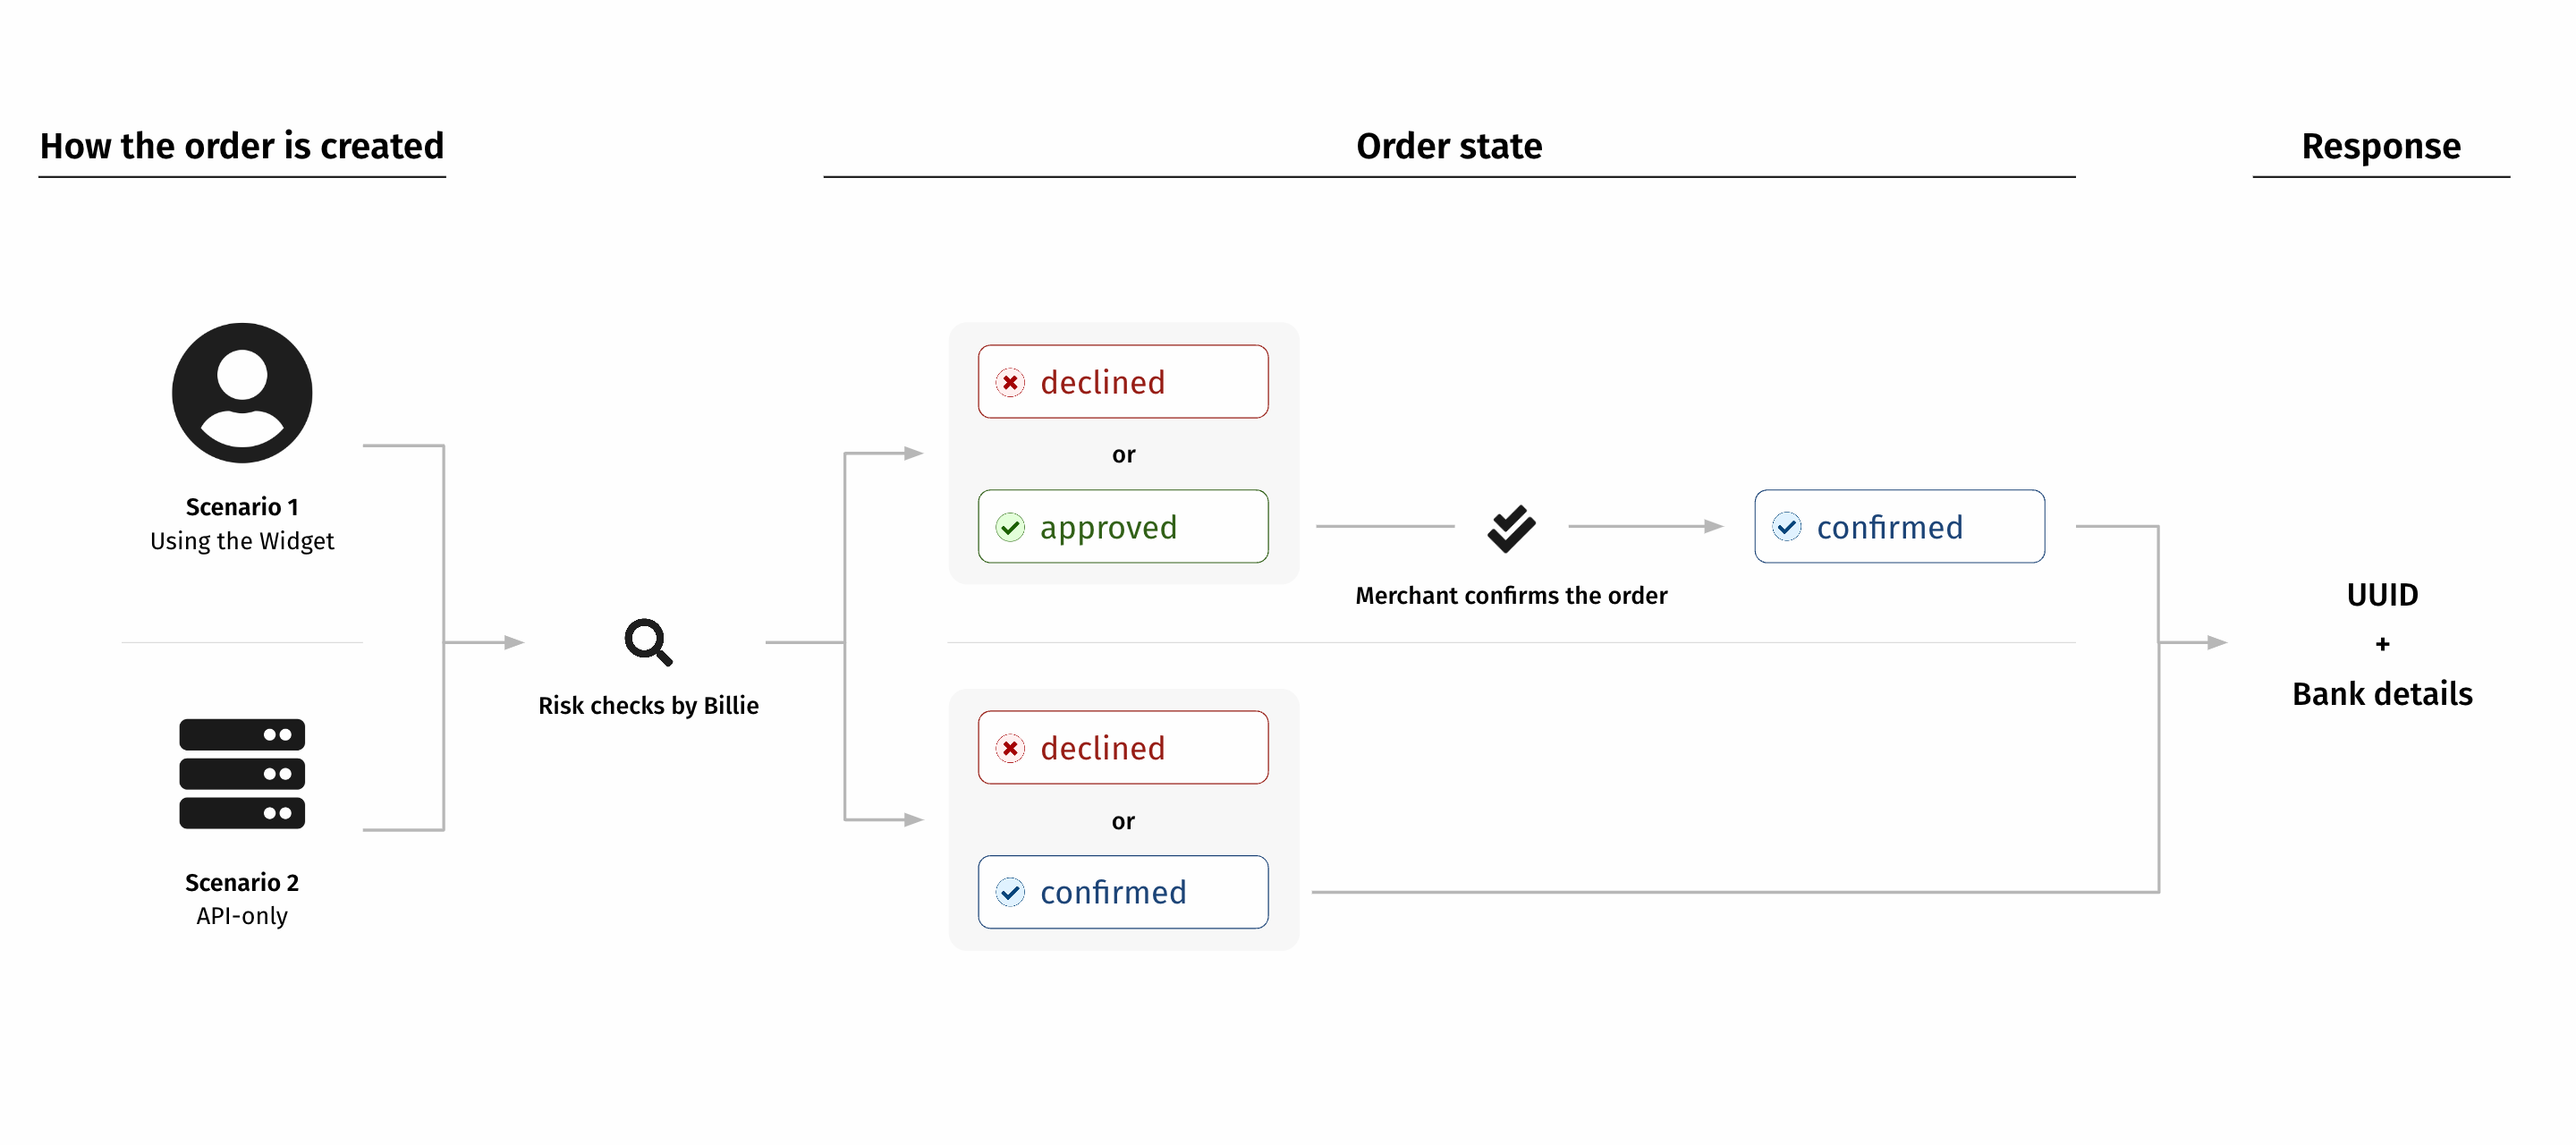
Order Creation Overview
Order States
Declined
This order state is final for both Widget and Direct API. Declined customers need to choose another payment method. This option needs to be built into the flow as declined orders are expected to happen from time to time.
Approved
This state is only available for the Widget. After an order is approved by the customer and Billie, you need to submit the order confirmation from your backend to finalize it and make it
confirmed.
Confirmed
This order state is final for both Widget and Direct API. If the order was created through the Billie Widget, this state happens after
approved. If the order was created through a direct API call, this state will be an instant answer for a outcome is positive.
Confirmed and Declined are the final state for both flows, Widget and Direct API.
At the end of the order creation process, you will receive a UUID that you need to store, as it is the main identifier for all orders with regard to Billie. You will also receive bank details that your customers must use to pay their invoice.
The bank details must be added to the invoice you send to your customers, or at least a note that Billie will send payment details soon.
Do not print your own bank details on the invoice. The customer must pay Billie, not you.
Authenticating yourself
All API operations are secured by OAuth 2. This is following the default process of this well-known industry standard. Obtaining a token is described in the section Request OAuth Token.
Using the HPP
After obtaining the token for authorization, you will need to create a Session. This Session is needed to initiate the HPP that the customer uses to give his consent to the transaction. The call is issued from your backend system.
The used API call is HPP Checkout Session Create.
The Session you create will be used to initiate the HPP. Here is the data required to initiate the HPP:
| Merchant data | |
|---|---|
| Merchant name | As registered with Billie |
| Order data | |
|---|---|
| Amount | The total amount of the order. |
| Payment duration limit | The days the payment is due after shipment. |
| Delivery address | The delivery address of the order. |
| Debtor company | The name and address of the debtor company. |
| Debtor person | The name of the person representing the company. |
| Line item | You should provide at least one line item. |
You can find details about the documentation of the API call HPP Checkout Session Create.
The HPP returns the Session ID and that is used by you to either a success UPR or a failure URL. In both cases, you call Get Authorization for more details. If the order is authorized, the next step is to confirm the order from your backend. This is the last step of gathering the consent of all parties (Billie, customer and merchant), so it is really important to finalize the order confirmation.
The amount that you submit in the confirmation call must not be higher than the amount submitted in the widget. If you have something like rounding errors from time to time, be aware that this can prevent a successful confirmation if the amount in the confirmation is higher than in the initialization.
Be aware that the response object of the Get Authorisation contains data that you need to use in the order confirmation call. You have to read the response and transform it to the request object format of the order confirmation.
To confirm the order, you will use the Checkout Session Confirm API call
Backend order creation with HPP
You can follow the above approach also to create orders from the backend, including sending the buyer a link to the HPP for order confirmation. In the case that the hpp_telesales flow is triggered, the order is confirmed automatically after the buyer accepted the order, and you are notified by a web hook event about the outcome of the asynchronous checkout attempt.
Backend order creation without HPP
You can create orders from your backend after the customer has placed an order with you via another channel like telesales, email etc. This integration need to be discussed and approved by Billie in any case.
For that, you have to call the Create Order API call. This is the only call needed from the backend, and it will be instantly answered with either confirm or decline.
Here is the data required to create an order via backend:
| Merchant data | |
|---|---|
| Merchant name | As registered with Billie |
| Order data | |
|---|---|
| Amount | The total amount of the order. |
| Payment duration limit | The days the payment is due after shipment. |
| Delivery address | The delivery address of the order. |
| Debtor company | The name and address of the debtor company. |
| Debtor person | The name of the person representing the company. |
| Line item | You should provide at least one line item. |
Save and attach the returned UUID of the order creation or order confirmation to your own order data, as it will be the main identifier used to manage the order during its lifecycle.
Legal Forms
For a successful order creation call, you have to submit the legal form of the customer. You can get the legal forms and the associated codes by calling the Get Legal Forms endpoint. As a response to this request, you will receive a list of legal forms that you can use to match against the legal form of your customer. The list of legal forms contains a code for each legal form. You will use these codes to match the information your customer submitted.
Best Practice:
- Keep the list of legal forms somewhere accessible and refresh it once a day.
- Do not call the Get Legal Forms' endpoint before each Create Order call.
You will use the API call Get Legal Forms.
Updated 3 months ago